
How to Start Selling on Amazon India?
How to Sell on Amazon India, If you’ve ever considered selling across the pond, Amazon India might be a good place to start. The 5 years old marketplace get 308 Million visitors a month, now the full array of Amazon Advertising products — putting even more potential customers and sales within reach.
Amazon.in also offers the much-coveted Prime membership, giving 90 per cent of Indians free two-day shipping.
So many peoples want to sell on Amazon India and want to earn a lot of money out of it but they don’t know how?
people who need to do it through themselves Serious serious mistake whilst registering as amazon seller India.
I will explain to you the Complete process, how to sell on Amazon India for beginners step-by-step with no step skipped. I will Also to explain to you about the necessary documents that you required for Amazon registration as a seller.
Document Required for Amazon Seller Account India Sole proprietor & Individual.
- Pan Card
- GST Number
- Bank Account
- Phone Number
- Email Address
In Case Private Limited Company
- GST Registration Number
- Copy of Certificate of Incorporation
- Copy of Memorandum of Association
- Phone Number
- Email Address
- Bank Account Number
Note: Private Limited Company is the most preferred form for Amazon Seller Account Registration can scale up in the future. If you have plan long term selling on Amazon India then Registration Private Limited Company.
How to make Amazon Seller Account India.
Step 1. Go to Amazon.in scroll down you will see option Sell on Amazon. Click on it below Picture.
Note: Use the Desktop/Laptop for Sign up Amazon seller account.

Step 2. If you have already Amazon Account need click “Start Selling” or you are new Seller “Start Here” both mention below picture.
How to Sell on Amazon India
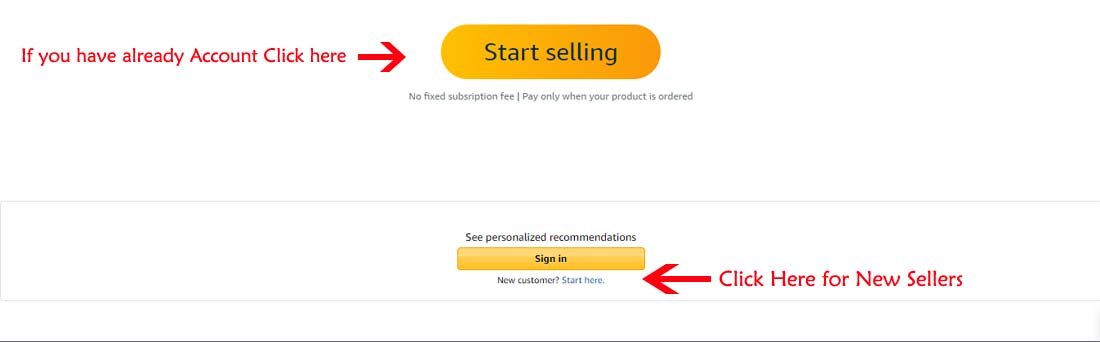
Step 3. Now you need to create Amazon Seller Account India. If you have already an account need a sign-in account to follow the below pictures.


Step 4. You choose a good business name to sign up for Amazon Seller Account India. Write down your business name and tick on the agreement, Then continue for next step.

Step 5. Now you need to verify phone number through OTP (One time Password). Now you will be direct to the Seller Information Section automatically.

- You need to choose the best and unique store name.
- Choose a Products Category ( You can change it any time, Also you can more than one category) after filling the address detail correctly before the next step.
Amazon Easy Ship charges?
Note Amazon easy ship service not available at every pin code, but Amazon gives you the option to choose 3rd party courier service. If Amazon’s easy service is not available at your Pincode. Amazon easy ship charges visit.
If Amazon easy service not available at your Pincode, so you choose 3rd party Courier services like Blue Dart, DTDC and Indian post.

How to add GST Number in Amazon?
Step 6. Now you need to fill the Tax detail. Click on “YES” when they ask “Do You have GST” then Continue.

- Click on “I will Update Later” if you don’t have “GST Number” and “PAN Card” yet. Follow the Below picture.
- If you have Both things in hand then fill it up. When you complete fill carefully after Click “NEXT”. Now you will be a move to another section.

How to Create Uk Private Limited Company from India
Step 7. On this section, you have little “SELLER INTERVIEW”
- You need to choose the category as per your business. Just click your category products “WHERE DO YOU GET PRODUCTS FROM”
- Also, you choose with “Manual Turnover” Then select how products you wanna sell on Amazon India.
- If you have a problem select products follow the below picture.

Step 8. Now you on finally Step Amazon in India “DASHBOARD SECTION”
- Now you need to search for good selling products after can “START LISTING”


- Now you need to fill Bank Account and Tax detail. You can see below the PIcture.

- It depends upon under which category your products come.

- You choose A GEN_STANDARD tac slab in general.

- Now need to click on “SAVE” Button.
- You need to upload “SIGNATURE”
- When you complete Signature after Click “LAUNCH YOUR BUSINESS. You can see in below pictures.


- You can see the final Amazon India Seller Dashboard in front of you.
- You can manage your products from the Inventory menu.
- You can change and Set Price at any time for the products. You can manage all orders, Products that customers return.
- You can the Amazon India Advertising Program promoted your products on Amazon.
- If you wanna check about Payment go to the “REPORTS” Section. There you can see all the payments.
- If you have some problem with your Buyer can “Manage Your Case Log”.
Congratulations! Now Your Amazon Seller India Account Ready for Selling.